-
 Français
-
 English
(updated on January 13th, 2021)
We are primarily looking for aerial footage related to landscape and architectural heritage of the world filmed with talent :
the most beautiful landscapes, villages, towns and monuments, filmed in all seasons, at the finest hours, under new and spectacular angles (drone effect for example, or cineflex).
All major landmarks as well as all the activities conveying strong concepts are interesting and good sellers.
News topics are currently not taken unless they represent a long-term interest (eg archive footage)
Images that will be successful on the stock footage market must be created to last and impress.
The key of your success with HOsiHO comes first and foremost by the quality of your images, its originality, the care and the talent you have devoted to shoot it.
When we edit your submitted images, we always keep in mind the possible uses a buyer might have with it. The more, the better.
It is therefore essential to approach your aerial shooting with also a buyer perspective.
Don't miss our tips to improve your aerial & drone footage sales, neither our Image Bank Survival Guide.

Types of images to submit to HOsiHO
We have been in a niche market since 2014 with a clear focus on aerial imagery, however, we are now looking to broaden our collections to other highly sought-after creative techniques and we invite you to contribute to these new collections :
Aerial footage
Aerial & ground VR360° footage
Timelapse/Hyperlapse (aerials / high-angles / ground)
DroneLapse
| Join our contributors |

Portal Submission Steps :
- Prepare your images by following this guide depending on whether you are submitting footage (see 5/) or stills (see 4/)
- Have the written permissions of people and owners of recognizable private property (Releases): download it from this page (contributors access only)
- Images shot by drone : you need to be an operator duly registered and have operated the flights with all needed permits, whatever the country
- No brands, logos, vehicle registrations should be clearly identifiable (blur, hide, or cut it in that case), otherwise we will sell it only under our Editorial license, therefore with a limited use thus less potential sales
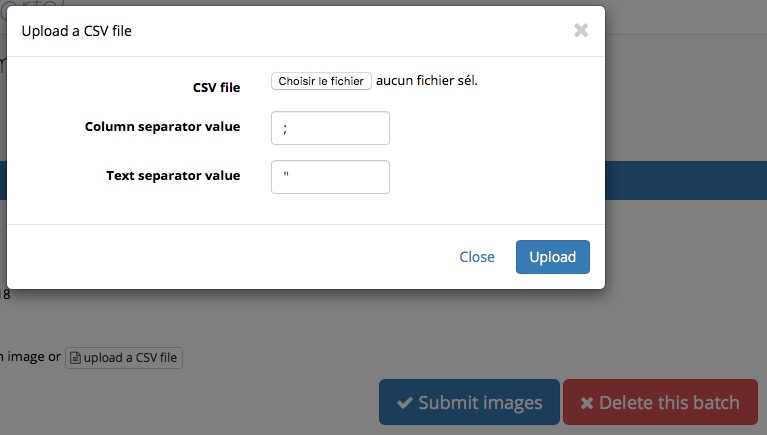
- Your images must includes metadatas: Title, a complete caption and a dozen keywords specifying the places and/or the main activity. Fill in all the fields (mandatory) of our CSV Template, that you can also downloadab from the Documentation tab (follow the various steps to prepare it).
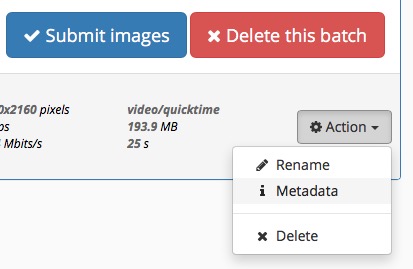
- Alternatively to the CSV Template you can enter your metadata for each image, either directly via our online form (go to Action / Metadata), or with your own software or catalog (ie: Lightroom, iviewMediaPro or Photoshop for stills, Adobe Bridge for footage. In all cases, it is necessary to fill in the required fields as they are mandatory (cf paragraph 6 /)
- Follow the instructions of the Submission process (contact us for any questions)

Tips before your next flights :
- Think about the image to bring back before taking-off and avoid approximative framing or erratic mouvements during the flight. Never shoot, neither submit, panoramic footage if the drone is stationnary (nobody wants a video 360° panorama !). We only accept panoramas while the drone is moving from a point to another (travelling or ascent/descent)
- Being as close as possible to the subject (for the drone)
- Flowing flights and movements, no clashes, smooth and slow camera move
- Vary the flights and angles on the same site: avoid to always make a simple ascent. With a drone, think of lateral flights, oblique, coiled, spiral, descents, flights back (playing the effect of surprise), graze the subjects, do not over-use the zoom.
- Make at least two shots of the same subject at different flight speeds so one will have the choice of duration: for example, make a first take in 10 seconds, the other one in 25 sec. This will increase your chances of sales.
- Footage must be stable, fluid and vibration-free, with no drone elements in the frame: propellers, landing gear...
- Do not send images where you clearly see the shadow of the aircraft (unless it is the subject!)
- Avoid over-tuning your camera: you have to be on a Neutral CineLike profile, avoid "burnt" high-lights, strong contrasts, and too much color saturation. By leaving the customers room to make their own corrections/calibration, you will increase your sales revenue.
- Preferably use a good quality 4K video camera with a big sensor (DJI X5, X5s, X7 or P4P 1 inch) and avoid ultra-wide angle lenses that are too distorted (fish-eye effect)
- Check and clean the lenses and the sensor (watch out for dust on footage !)
- Preferred Footage framerate & codec: we accept all framerates, but we prefer to see footage in PAL at the following framerates: HD at 25/50p, UHD/4K at 25p/50p, always in H264 or H265
- Don't shoot at 2.7k resolution (if you did so, please send the FullHD version)

Prepare your stills
- Use at least a 12 mega-pixels camera and keep the native resolution of your photos without any interpolation.
- Send files in Jpeg12
- The photos must be sharp, lighly retouched and dust-free (check and clean any black dots on blue sky)
- Embed information in English in all the fields of the online form (see details on paragraph 6/ ) or fill in our CSV Template and upload it along your images
- Upload your retouched and captioned stills through this portal. If necessary, add or correct informations via the form (Menu i Metadata )

Prepare your footage
- Cut and edit the best part of your original footage and submit only mute individual sequences (One Clip is One Angle Only)
- We only accept the H264 or H265 files in .MOV or .MP4: always export at the optimal quality and at the native framerate
- Accepted duration of edited videos: 5 to 75 seconds maximum. The ideal duration of a clip is 20 to 30 seconds
- Always start / end an aerial sequence stationnary. When editing, leave 1 to 2 seconds of margin at the beginning and end.
- Post-stabilize your sequences if vibrations or sudden movements. Do not send videos with Jello (rolling-shutter) or any visible vibrations
- Apply very slight exposure / contrast / saturation corrections, if needed
- Correct the wide-angle lens distortions (domed horizon effect) with a plug-in. For FCPX on Mac, this app is free: Alexa4D Wide Angle Fix. Set to Custom and enter a very small value of 0.01 or 0.02 depending on the lens.
- Submit your footage at its original frame rate (eg 25/30/50p...)
- Keep at least the original bit rate : when encoding if you have to edit the sequence, make sure to choose a minimum target bitrate of 30mbps (in HD) and 70mbps (in UHD / 4K). We strongly recommend these Bitrates settings: 40mbps (in HD) and 100mbps (in UHD / 4K).
- MAC user TIPS: If your clip only requires a simple In / Out cut - ie no correction or stabilization - the easiest and fastest way is to do it in Quicktime:
- Open the footage file and use the "Trim" function in the Edit menu (cmd + T)
- Adjust the In/Out points and save the shorten clip at its original quality (no recompression done)
- If your clip requires corrections and / or stabilization, use Adobe Premiere or Final Cut Pro Pro software by choosing the best possible video codec for both import and export of the files :
- on Mac / Final Cut Pro: always import the file as an Apple ProRes 422 LT one (beware that Project must be at the same framerate than the original files otherwise you'll miss frames and get a kind of 'jerk' effect! ). Export and submit each file as H264/H265 in .MOV with an ideal bitrate of 40mbps (in HD) and 100 Mbps (in UHD / 4K)
- on PC : it is necessary to import / export your footage using the less destructive codec : see the options recommended in 7/
- Embed the required metadatas in English in all the fields of the online form (see details in 6/) or fill in our CSV template and then upload it
- Upload your edited footage as well as the CSV template along any related Model or Property Releases
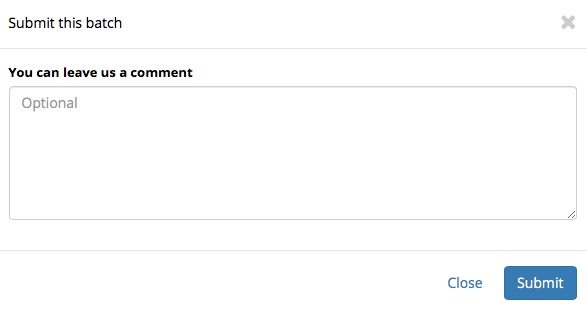
- Once the upload of footage and metadata is completed, you can Submit the batch and send us a comment via the dialog box. For example here you can tell us if you have the original footage available in ProRes422HQ or RAW. If this is the case, we will tag them in order to be able to identify those clips in case a customer request it (in this case the delivery of ProRes or Raw files will generate additional revenue)

IPTC Metadatas: required information (in English only)
In order for your images to be found on the internet during a search, it is important to pay particular attention to the keywording phase.
This is a boring but essential step for marketing your images.
On our side, we will complete your captions and add the most relevant keywords in the IPTC fields.
In order to do so, we need you to provide all the accurate informations related to the submitted images in English (we will then make the French translation)
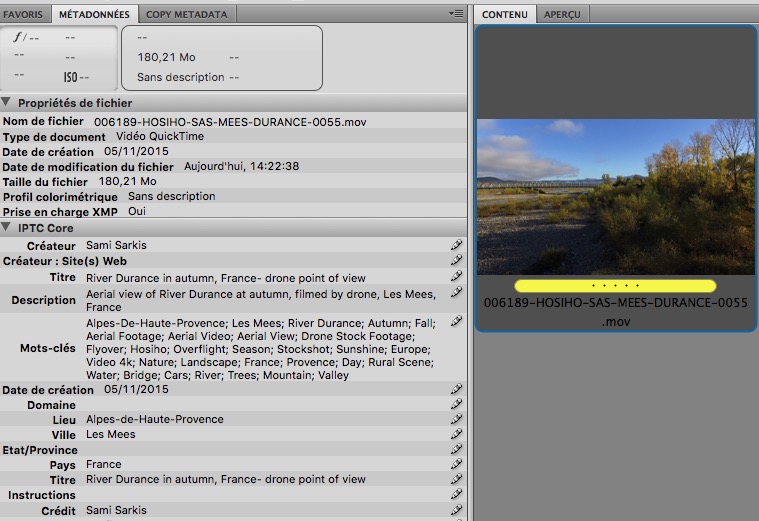
This information must either be embeded directly into the image in the IPTC fields (see the screenshot of a video), or be associated to the image thanks to our online form. For a batch, you can also use the Csv template that you have to fill (download it from the Documentation page - contributors access only)
Here is the comprehensive list of fields to fill in English, with some useful highlights (avoid typing any accents and special characters that will be rejected):

FileName Always include the file extension .MOV or .MP4 => yourfilename.mov - Filename must be identical on the template and the portal
Keywords (commas separator, suggest maximum 35 essential keywords). A set of 15 keywords is automatically applied, depending on the image type you mentionned prior to your upload (ie Drone + Reel-time footage)
Name only main visible locations and subjects. Be accurate. No spam please.
Description (Longer than the Title. Be factual (what is going on there and where), Description must start and include this wording: Aerial view of .... , puis filmed by drone (or helicopter) . Do NOT explain how you are flying around.
Description Example: Aerial view of the Eiffel Tower and Champs-de-Mars, filmed by drone in winter, at sunset, Paris, France
Title (short sentence, like: Eiffel Tower in Paris at sunset )
Date Created (shooting day)
Location (state or province or district: only one of those here)
City (nearest city/village; not required if the shooting is out of any urban zone or offshore)
Country (full name, no abbreviation)
Credit (creator's name, will be include in the copyright mention. Don't type the © sign)
Model Release (Y or N)
Property Release (Y ou N)
IMPORTANT: Fill all the columns without any accents or special characters
List of special characters allowed in the metadata (the system will reject the form if you use others):
- Blank space
- Period (dot) .
- Commas ,
- Semicolon ;
- Colon :
- Hyphen or Dash -
- Copyright symbol ©
- Apostrophe ' (not in Filename, though)
- Slash / (not in Filename, though)
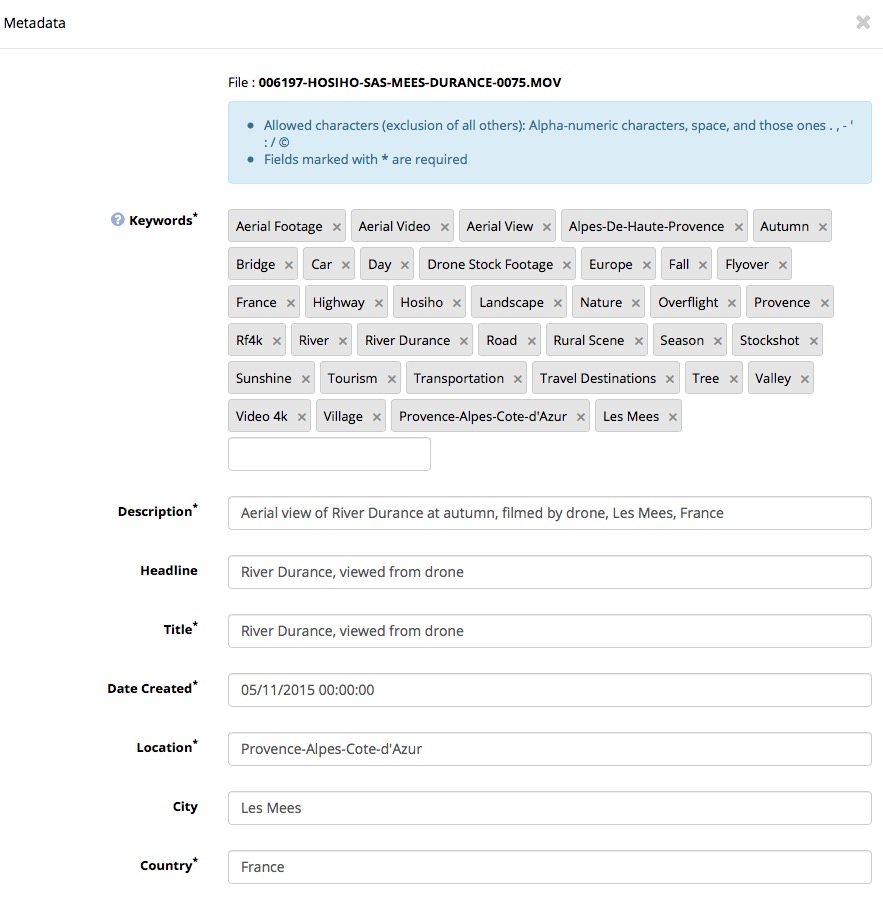
Adobe Bridge can be used to directly embed Metadatas both to Footage and Stills :
Pop-up window under the i Metadatas menu: upload your CSV template from here :
Metadata Form for every image: complete and check your Captions and tags before submiting :

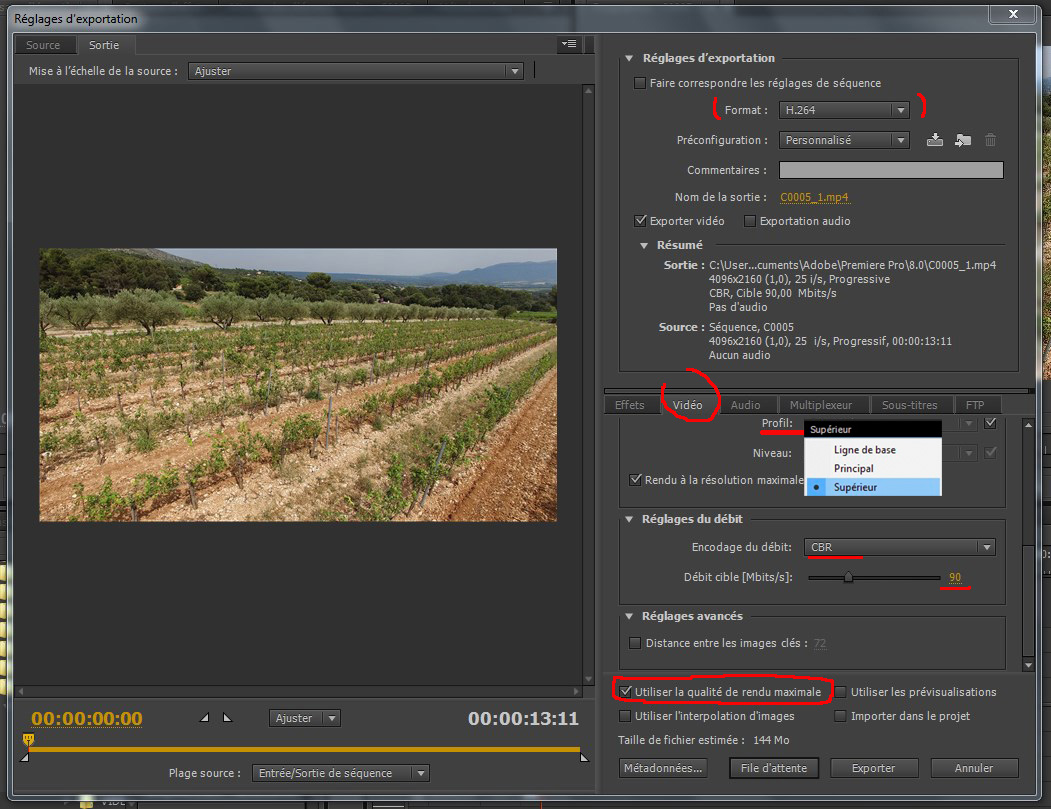
Editing footage with a PC computer
If you use a PC and work under Première, here are some settings to preserve the quality of your original
Import and edit the original footage at its original codec and settings (framerate/size).
When you'll export it, our tests give the best result with the parameters circled in red of the window "Export settings in H264" (see screen below)
Choose the H.264 format and apply the following guidelines (see Premiere Pro screenshot):
- In the Video tab, check Rendering to the maximum resolution, switch the Profile to Higher and for Rate settings choose CBR encoding with a target bitrate of at least 30mbps (in HD) and 70mbps ( in UHD / 4K). We recommend these bitrates: 40mbps (in HD) and 100mbps (in UHD / 4K)
- At the very bottom check Use the optimal rendering quality: this ensures an acceptable result without compression artifacts
Always work on the frame rate and at the shooting original size (HD / UHD / 4K) in order to avoid the possible missing frames or 'jerky' effect due to a frame rate change during footage import or export.
Premiere Pro 8.00 (2014) - Export Settings in H264 window
Thank you for reading HOsiHO guidelines
If you still have any questions, please feel free to ask us
by email to Contributors Service or by phone +33 768.347.313
Looking forward to welcome your new aerial images, timelapses, dronelapses et VR 360° footage !
Don't miss our other guides full of invaluable advice: :